Dust Particles For Player2D
🎮 Tutorial – Adding Dust Particles to Your Player in Godot 4.4.1
(English + Français)
Disclaimer
I am a beginner developer in Godot and Unity. I try simple things and I love to share my knowledge and discoveries to make development easier for other beginners on Godot. 😊
🇬🇧 English Version
Step 1: Create the Dust Scene
-
Create a new scene with a GPUParticles2D parent node
-
Rename it Dust
-
Add the dust.png texture to the parent node
-
Inspector settings:
-
Time:
0.6 -
Explosiveness:
0.8 -
Randomness:
0.7
-
-
Process Material → New ProcessMaterial → Open
-
Spawn → Position → change Emission Shape: Point → Sphere
-
Emission Sphere Radius:
6 -
Velocity → Spread:
35 -
Acceleration → Gravity Y:
0 -
Offset X:
-5
-
-
Display → Scale
-
Min:
0.1 -
Max:
0.3
-
-
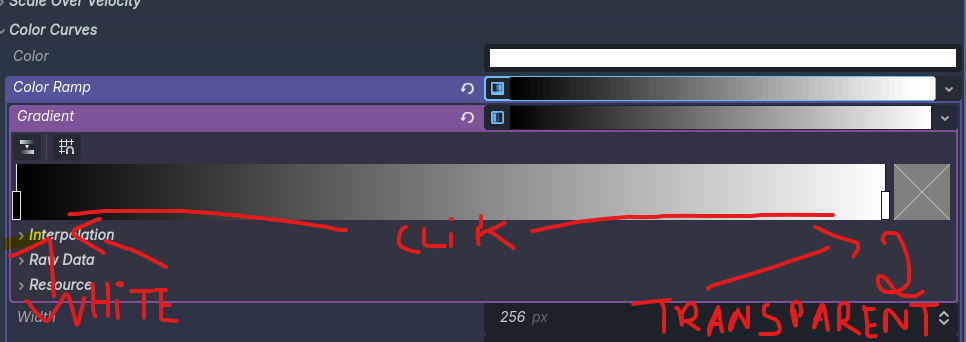
Color Curve → New Color Ramp
-
Gradient 1: White
-
Gradient 2: Transparent
-
-
Save scene as Dust.tscn
Step 2: Prepare the Player
-
Player needs AnimationPlayer and Sprite2D (⚠️ not AnimatedSprite2D)
-
Create animations: Idle and Run
-
Instance Dust scene inside Player → Editable Children
Step 3: Add Dust to Run Animation
-
In Run animation: select Dust node
-
Process Material → Make Unique
-
Reposition dust slightly left for natural look
-
Add keyframes for Transform/Position, Emitting, Visibility
-
At end of Run: set Visibility to false
-
In Reset Track: uncheck Emitting and Visible
Step 4: Fix left/right direction
@onready var dust = $Dust # adapte le chemin selon ta scène @onready var sprite = $Sprite2D func _process(_delta: float) -> void: # si le sprite est retourné, on inverse l'échelle X de la poussière if sprite.flip_h: dust.scale.x = -1 dust.position.x = 10 # ajuster la position quand c'est à gauche else: dust.scale.x = 1 dust.position.x = -10 # ajuster la position quand c'est à droite
Step 5: Hide Dust in Idle
-
In Idle animation add keyframes:
-
Emitting = false
-
Visible = false
-
🇫🇷 Version Française
Étape 1 : Créer la scène Dust
-
Créer une nouvelle scène avec un parent node GPUParticles2D
-
Renommer le node : Dust
-
Ajouter l’image dust.png au node parent
-
Inspecteur :
-
Time:
0.6 -
Explosiveness:
0.8 -
Randomness:
0.7
-
-
Process Material → New ProcessMaterial → Open
-
Spawn → Position : Emission Shape = Sphere
-
Emission Sphere Radius:
6 -
Velocity → Spread:
35 -
Acceleration → Gravity Y:
0 -
Décalage X:
-5
-
-
Display → Scale
-
Min:
0.1 -
Max:
0.3
-
-
Color Curve → New Color Ramp
-
Dégradé 1 : Blanc
-
Dégradé 2 : Transparent
-
-
Sauvegarder en Dust.tscn
Étape 2 : Préparer le Player
-
Le Player doit avoir AnimationPlayer et Sprite2D (⚠️ pas AnimatedSprite2D)
-
Créer deux animations : Idle et Run
-
Instancier Dust dans le Player → Editable Children
Étape 3 : Ajouter la poussière à Run
-
Dans Run, sélectionner le node Dust
-
Process Material → Make Unique
-
Repositionner légèrement à gauche pour un rendu naturel
-
Ajouter des keyframes : Position, Emitting, Visibility
-
Fin de Run : Visibility = false
-
Reset Track : décocher Emitting et Visible
Étape 4 : Corriger la direction gauche/droite
@onready var dust = $Dust # adapte le chemin selon ta scène @onready var sprite = $Sprite2D func _process(_delta: float) -> void: # si le sprite est retourné, on inverse l'échelle X de la poussière if sprite.flip_h: dust.scale.x = -1 dust.position.x = 10 # ajuster la position quand c'est à gauche else: dust.scale.x = 1 dust.position.x = -10 # ajuster la position quand c'est à droite
Étape 5 : Cacher la poussière en Idle
-
Dans Idle, ajouter keyframes :
-
Emitting = false
-
Visible = false
-
Download
Click download now to get access to the following files:

Comments
Log in with itch.io to leave a comment.
nice tutorial!
Hello :) Thank you <3
:)